Connect to your UniFi Controller via the web app or https://unifi.ui.com
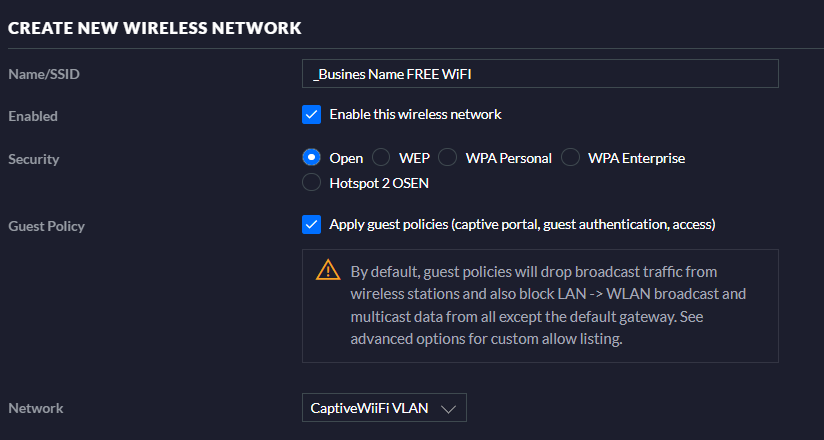
- Select Wireless Networks and press the + CREATE NEW WIRELESS NETWORK button
- We recommend adding a network name like the following _Business Name FREE WiFI , this will ensure your company will be displayed at the top of all other networks.
- Ensure the Enabled button is Ticked ✅
- Security = Open
- Guest Policy must be ticked✅
- Network , if you have a Guest VLAN already choose this from the drop-down, or scroll to the bottom of this page to see our notes on how to add a Guest VLAN.
- If your network doesn't have a super-fast connection and you'd like give guests a speed limit please click here to read our article on speed limitations.
Please see the example below
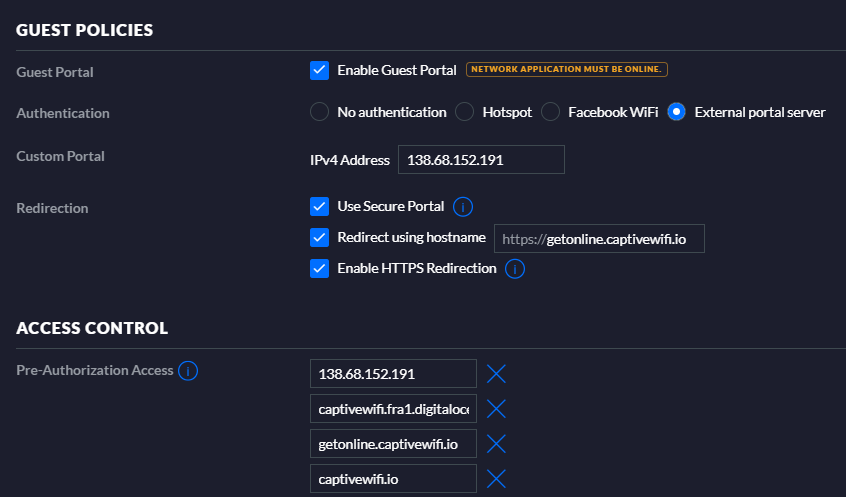
Click on "Guest Control" to complete the setup
- Enable Guest Portal ✅
- Choose "External Portal Server"
- IPv4 Address type in 138.68.152.191
- Enable Secure Portal✅
- Enable Redirect using hostname ✅ and type in getonline.captivewifi.io
- Enable HTTPS Redirection ✅
-
Click "Access Contol" and type in the following items.
getonline.captivewifi.io
captivewifi.fra1.digitaloceanspaces.com
5.101.109.44
138.68.152.191captivewifi.io
- Press Apply Changes
Please see the example below
Additional Recommendations 💻
We recommend adding a separate LAN for this network; feel free to reach out to your IT Team or if you need assistance, our support team can set this up for you in a few moments - click ➡️support@captivewifi.io This link will generate an email to our team.
If you have a UniFi Gateway
- Click the Networks Tab > Like the image below.

- Choose "Create New Network"
- Select Name and type in CaptiveWiFi VLAN
- Choose the interface (Usually LAN)
- Select the VLAN box and choose a VLAN that hasn't been used before we recommend 99
- Select Gateway IP / Subnet and type in a new LAN (we recommend 10.5.1.1/20) and press update - unless this conflicts with your network please choose another variation, this will give you 4,094 network addresses to use.
- Scroll down to DHCP Leases and type in 900.
- Press Save
If you have a different Firewall
- Set the VLAN for the WiFi network above
- Enable this network on your local Firewall
Head over to the Captive WiFi dashboard with your local admin credentials to complete the setup on the platform.


