TCP 8080 Port used for device and controller communication.
TCP 8443 Port used for controller GUI/API as seen in a web browser
TCP 8880 Port used for HTTP portal redirection.
TCP 8843 Port used for HTTPS portal
Note: If you have a UDM or Cloud Key instead of 8443 please use port 443,
If you are using a Cloud Key device, please ensure the following is completed before you continue:
The above port are forwarded in your firewall rules to your Cloud Key (take note of the SSL note above)
The Cloud Key has a static internal IP address or has a DHCP Reservation
The ISP has a static external IP address
You have external remote access to the Cloud Key
Connect to your UniFi Controller via the web app or https://unifi.ui.com
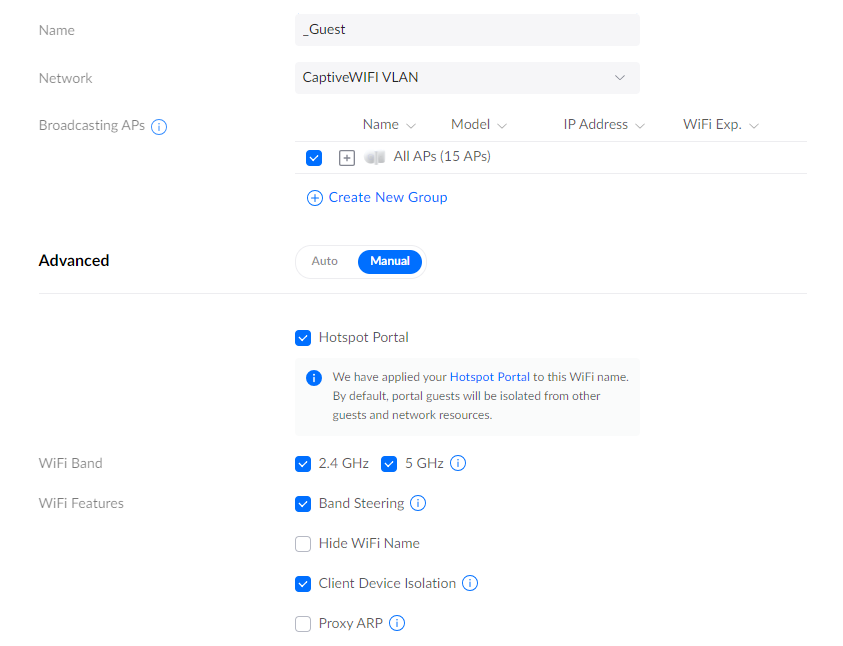
- Select Wireless Networks and press the + Create New button
- We recommend adding a network name like the following _Business Name FREE WiFI, this will ensure your company will be displayed at the top of all other networks.
- Select the "Manual" button
- Hotspot Portal must be ticked✅
- Client Device Isolation must be ticked✅
- If your network doesn't have a super-fast connection and you'd like to give guests a speed limit, please click here to read our article on speed limitations.
- Once the above information has been entered, please press "Add WiFi Network"
Please see the example below
Click on "Hotspot Manager" to complete the setup
It's located on the left menu see the image below
Now click the Landing Page option at the top of the page
Select the Authentication button and ensure External Portal Server ✅ is enabled.
Click "Edit" on External Portal Server and type in the following IP address 138.68.152.191
Click the "Settings" button to complete the setup (see example below)
Ensure all the boxes are selected ✅
Enter getonline.captivewifi.io for the Domain
Click "Add Hostname, IP or Subnet" and type in the following items.
captivewifi.fra1.digitaloceanspaces.com
getonline.captivewifi.io
5.101.109.44
138.68.152.191
|
Landing Page Settings: |
|
|
Domain |
connected.captivewifi.io |
Please do not use https://unifi.ui.com as the URL this will not work, please ensure that port forwarding is enabled to the UniFi platform
Once Logged in to the Captive WiFi Dashboard
Visit Integrations
- WiFi Hardware
- Select UniFi Automated, add the login credentials for the UniFi solution
- Once confirmed, this will populate all MAC Addresses and the Site ID


