How to Generate a UniFi API Key
This guide explains how to create a secure API key inside your UniFi Network controller.
The API key allows external systems such as Captive WiFi to connect securely to your UniFi controller without using your admin username and password.
Using an API key is the recommended and most secure method
Before You Start
You must:
• Be logged into the UniFi Network application
• Have admin access to the controller
• Be running a UniFi OS version that supports API keys
If you do not see the “Integrations” section, your controller may need updating.
Step 1 – Login to UniFi
Access your controller:
• Via https://unifi.ui.com
or
• Via your local controller address, for example https://192.168.1.1
Open the UniFi Network application.
Step 2 – Navigate to Integrations
Inside the UniFi Network app:
Go to Settings
Select System
Click Integrations
You should see a section labelled API Key.
Step 3 – Create the API Key
Click Create API Key
Enter a name, for example:
Captive WiFi Integration
Confirm creation
UniFi will now generate an API key.
Important
You may only see the API key once.
Copy it immediately and store it securely in a password manager.
If you lose it, you will need to delete it and generate a new one.
Step 4 – Provide the API Key to Your Integration Platform
In your external system (for example Captive WiFi):
• Enter your UniFi controller URL
• Paste the API key
• Test the connection
• Save the configuration
Step 5 – Install the API Key
Select WIFI Hardware
Select UniFi API Integration
Follow instructions on screen to select the correct location
Security Best Practice
• Do not share API keys over email
• Rotate API keys periodically
• Delete unused API keys
• Do not use your cloud UI.com login for integrations
Troubleshooting
If you cannot see the API Key section:
• Ensure your UniFi OS is updated
• Confirm you are inside the Network application, not the main OS dashboard
• Confirm your admin account has sufficient permissions
Now setup the captive portal
Connect to your UniFi Controller via the web app or https://unifi.ui.com
Select Wireless Networks and press the + Create New button
We recommend adding a network name like the following _Business Name FREE WiFI, this will ensure your company will be displayed at the top of all other networks.
Select the "Manual" button
Hotspot Portal must be ticked✅
Client Device Isolation must be ticked✅
If your network doesn't have a super-fast connection and you'd like to give guests a speed limit, please click here to read our article on speed limitations.
Once the above information has been entered, please press "Add WiFi Network"
Please see the example below

Click on "Hotspot Manager" to complete the setup
It's located on the left menu see the image below

Now click the Landing Page option at the top of the page
Select the Authentication button and ensure External Portal Server ✅ is enabled.

Click "Edit" on External Portal Server and type in the following IP address 138.68.152.191

Click the "Settings" button to complete the setup (see example below)
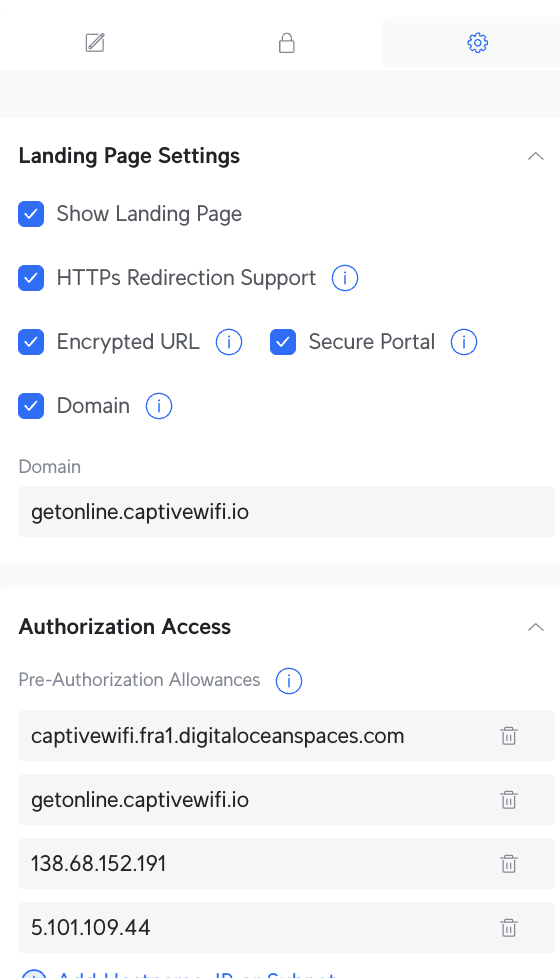
Ensure all the boxes are selected ✅
Enter getonline.captivewifi.io for the Domain
Click "Add Hostname, IP or Subnet" and type in the following items.
ENSURE THESE IP's & LINKS ARE PRE AUTHENTICATION NOT POST
captivewifi.fra1.digitaloceanspaces.com
getonline.captivewifi.io
5.101.109.44
138.68.152.191
We recommend adding a separate LAN for this network; feel free to reach out to your IT Team, or if you need assistance, our support team can set this up for you in a few moments - click ➡️support@captivewifi.io This link will generate an email to our team.
If you encounter an SSL error or unsecured error while browsing, it is likely due to the controller or UDM not having a valid SSL. To resolve this issue, please update the settings on the UniFi landing page to the following:
Landing Page Settings: |
|
Domain | connected.captivewifi.io |
Please also add connected.captivewifi.io to the pre-authentication access
Note: you will need the direct IP or URL for the controller to enable the UniFi API to authenticate guests to your WiFi,
Please do not use https://unifi.ui.com as the URL this will not work, please ensure that port forwarding is enabled to the UniFi platform
Once Logged in to the Captive WiFi Dashboard
Visit Integrations
WiFi Hardware
Select UniFi Automated, add the login credentials for the UniFi solution
Once confirmed, this will populate all MAC Addresses and the Site ID
NOTE: For the UniFi URL this needs to be the external URL Hostname or IP Address. Please do not add a (forward slash /) at the end of the URL