- Log in to your Aruba iAP’s GUI. It is recommended to update your device firmware to the latest available version.
- Network Setup
- The first step in configuring your access point is to setup a new network. Under the network section, select New:
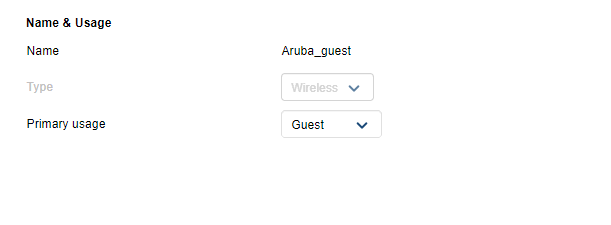
- A configuration dialog box appears. Enter the name (SSID) of your WLAN network and select GUEST in Primary usage. Press Next to continue:
-
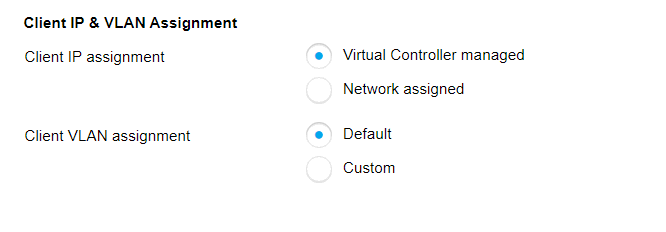
Under VLAN keep the default settings and press Next to continue:
- Select External as the Splash page type. Under Captive portal profile create a new profile.
- Captive Portal Proxy - Leave Empty
- Select RADIUS Authentication as Type and enter the following in IP or hostname and URL fields:
- IP or Hostname : getonline.captivewifi.io
- URL /guest/<site id> - the Site ID can be found on the Captive dashboard under - Integrations and WiFi Hardware
- Use HTTPS - Checked
- Captive Portal Failure - Deny Internet
- Redirect URL (this can be found under manage venue and unique id)
- WisPR - Unchecked
- Mac Authentication - Unchecked
- Under Auth Server 1 create a new RADIUS server and add the following parameters:
- Under Access Rules select Role-based:
-
Under Roles create a new profile named “before_login”. Create a new access rule for it:
- Similarly, create rules for all the domains listed below. This is required in order to make captive portal and social login work properly.
-
getonline.captivewifi.io
- connected.captivewifi.io
-
captivewifi.fra1.digitaloceanspaces.com
- kit.fontawesome.com
-
-
Check the “Assign pre-authentication role” option and select “before_login”:
-
The configuration is now complete.


Enable the Assign pre-authentication role and select create a role. Click on the Finish button to apply new settings.
To fix the SSL error, you will need to replace the default invalid certificate.
You can generate a valid SSL certificate for free on this URL - [https://www.sslforfree.com/]. You can let the page create a certificate signing request for you, or visit the following page for detailed instructions on how to generate a request manually - [https://community.arubanetworks.com/t5/Controller-less-WLANs/How-to-Create-a-Certificate-for-Instant-Captive-Portal-using/ta-p/277025].
Don't use a wildcard SSL certificate, we recommend using a subdomain - for example aruba.yourdomain.com.
Copy content of downloaded files certificate.crt, ca_bundle.crt, and private.key to a single file (aruba.pem).
Upload this file to your Aruba IAP - click on Maintenance -> Certificates.
Certificate type: Captive portal server certificate
Certificate format: PAM
Click on the Upload Certificate button to apply new settings.